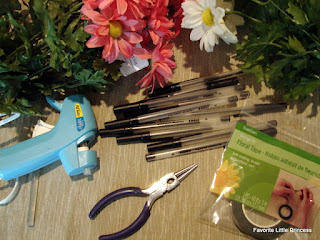
I know I gave away what craft was coming today, but what you didn't know is that K2 was going to be the crafter of these flower pens. Yep, this one is super easy for the kiddos. You'll want to supervise the glue gun use and be sure you have the low-temp gun.
If you have lots of teachers, this is a perfect gift because you can make several of them in a short amount of time and it's pretty inexpensive. There are a gazillion kinds of silk flowers in every color and size imaginable. We selected some smaller flowers so they would be easier to write with. We also included leaves on ours, but that's totally optional. You don't need to get expensive pens either - you're just going to be covering them up anyway. You can get everything you need at your local Wal-Mart, too, so no worries if you don't have a craft store nearby. Floral Tape is about 99 cents a roll and you won't use all of it on this project alone. I used my jewelry pliers because they have a wire cutter on them, but you may not even need to cut anything. We only cut the leaves apart. Everything else just popped right off the stems.
This is much easier if you use pens that have a capped end. You can still do this with the sealed ends, but this kind makes the finished product look more professional. Just pop that end off. You may need to help the kids with this part if your children bite their nails off like K2.
We like to prep everything first and then we can make a bunch at one time. Get your pens ready, separate your leaves, and detach your flower from the stems.
Squeeze some glue into the open end of the pen and then insert your leaves and flower.
Then wrap the pen with the floral tape. Be sure to pull it tightly to keep the tape from slipping. I like to wind at a slight angle to keep a nice line. Plus, that's how I learned to use the tape when doing floral arrangements.
Put the cap back on and you're done!
She's so proud that she did it all herself. We made about 20 of these in 30 minutes. If you place a bunch of them in a holder, it looks like a bouquet of flowers. Hmmmm...am I giving stuff away again? Guess you'll have to come back tomorrow to find out!


Comments