
Do we really need all these shoes? You can only wear one pair at a time. I guess it's a necessary evil. Shoes aren't my thing. I have more flip-flops and athletic shoes than anything else. I'm happy with that. My favorite shoes are actually my slippers. I could wear them all day and would wear them out if I thought I could get away with it.
My hubby, on the other hand, can't have enough shoes. Our youngest K takes after him. We have a fairly large rack for our shoes in the closet to accommodate all those shoes. It's nothing fancy and fulfills my two requirements. It's functional and doesn't take up a lot of space. But there is one huge flaw. Our shoes don't stay put!
It ok for shoes that have heels on them because they hang on the back bar. Shoes like this:
 But if they are flat, like tennis shoes or flip flops (like most my shoes) then they slip right off and I trip over them trying to get to my clothes.
 What's a girl to do? I don't have a Mr. Big to come put a fancy shoe rack in my closet. I tried little rubber dots with sticky stuff on the back.
 Those are the last two left. The rest have fallen off. They aren't cheap either. But I have a solution - make my own grips! And it's free. You probably have everything you need already. Just heat up the glue gun and let's get started.
 First, I cleaned off the bars with alcohol. A little goes a long way. I just wanted to be sure the glue would stick.

Then, I made sure all my rods were straight and tightened up the screws. Might as well do it all while I have it empty.
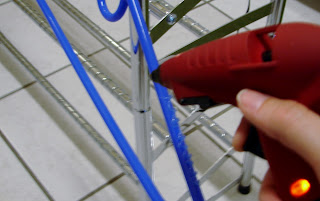
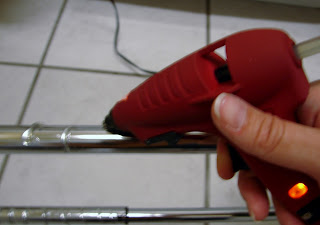 Next, take your pre-heated glue gun and start making lines or squiggles down the bars. Be sure to use the high temp, if you have a gun with dual temps. I just made a light line of glue every inch.


My hubby, on the other hand, can't have enough shoes. Our youngest K takes after him. We have a fairly large rack for our shoes in the closet to accommodate all those shoes. It's nothing fancy and fulfills my two requirements. It's functional and doesn't take up a lot of space. But there is one huge flaw. Our shoes don't stay put!
It ok for shoes that have heels on them because they hang on the back bar. Shoes like this:


Then, I made sure all my rods were straight and tightened up the screws. Might as well do it all while I have it empty.


Time to test it out!

Perfect! No more sliding off the bars. You can also do this with your hangers to prevent those wide necked shirts from slipping off. What do you use your glue gun for besides crafts?

Easy Peasy and cheap as nails! Plus, I vacuumed the baseboards that I haven't been able to reach in the past few years. Just look at my happy shoes!

Just one pair missing...

Ahhh....much better.

Comments
BTW I'm stopping over from Topsy Turvy linky party and am your newest follower! I'd love for you to stop by and check out my blog, if you have time.
Xoxo,
Sarah
www.adventuresofourfamily.com
thank you so much for coming by to see my pantry! i LOVE this idea - genius!
off to check out more of your blog - looks fun in here!
samantha :-)
AP